5 Best Stylish Popular Posts Widget For Blogger Blog In 2023
नमस्कार दोस्तों, हिंदी टेक बुक में आपका स्वागत है। जब हम Blogger में नया Blog बनाते हैं तो अपने ब्लॉग में कई तरह के Widget लगाते हैं। जिनमें से एक Popular Posts Widget होता है, जो आपके ब्लॉग के Most Visited Posts की लिस्ट को दिखाता है। आज हम इस पोस्ट में 5 Best Stylish Popular Posts Widget For Blogger Blog In 2023 के बारे में बात करेंगे।
जब कोई User हमारी वेबसाइट पर Visit करता है और उसे Popular Posts की लिस्ट दिखाई देती है, तो वह Popular Posts की लिस्ट में से किसी भी पोस्ट को पढ़ना जरूर चाहता है। क्योंकि उसे पता होता है कि यह जो पॉपुलर पोस्ट की लिस्ट है इसमें अच्छी जानकारी होगी जिससे कि इन पोस्ट्स को ज्यादा बार पढ़ा गया है। इसलिए अपने Blogger Blog में Popular Posts की List जरूर लगाएं। तो चलिए शुरू करते हैं “5 Stylish Popular Posts Widget For Blogger Blog In 2023” के बारे में।
यह भी पढ़ें:
Blogger Blog Me Whatsapp Share Button Kaise Add Kare
How To Add Custom Domain To Blogger GoDaddy 2023
Bing Webmaster Tool Me Blog Ko Submit Kaise Kare
Top 5 Best Stylish Popular Posts Widget For Blogger Blog In 2023
 |
| 5 Best Stylish Popular Posts Widget For Blogger Blog In 2023 |
Blogger में Popular Posts Widget लगाने से आपके ब्लॉग का Pageviews भी Increase होता है। हम इस पोस्ट में आपके लिए 5 Different Type Of Stylish Popular Posts Widget प्रोवाइड करेंगे। जिनको आप अपनी वेबसाइट में आसानी से लगा सकते हैं। इससे आपकी वेबसाइट में Popular Posts की लिस्ट Attractive दिखाई देगी। इसके लिए आपको सिर्फ Copy-Paste करने की जरूरत है। ये “5 Updated Stylish Popular Posts Widget For Blogger Blog In 2023” आपके ब्लॉग के Look के लिए बेहतर साबित होंगे। चलिए जानते हैं “5 Updated Stylish Popular Posts Widget For Blogger Blog In 2023” के बारे में।
और पढ़ें:
Google Search Console Me Apni Website Kaise Jode
Blogger Mein JQuery Kaise Add Kare
Blogger Mein Automatic Table Of Contents Kaise Banaye
Blogger Mein Recent Post Widget Kaise Lagaye Hindi Me Full Guide
ब्लॉगर ब्लॉग में Popular Posts Widget कैसे लगाएं?
Blogger Blog में Popular Posts Widget को लगाना बहुत ही आसान है। इसके लिए सबसे पहले आपको अपने ब्लॉगर के डैशबोर्ड में जाना पड़ेगा।
- Layout पर क्लिक करने से आपके ब्लॉग के सारे Section और उनके Widget की लिस्ट दिखाई देगी।
- अब आप वह जगह(Section) चुनें, जहां पर आप पॉपुलर पोस्ट विजेट लगाना चाहते हैं।
- मान लीजिए आप Sidebar में पॉपुलर पोस्ट विजेट लगाना चाहते हैं। इसके लिए Sidebar Section में Add A Gadget पर क्लिक करें।

Click On Add A Gadget
- जब आप Add A Gadget क्लिक करेंगे तब आपको Blogger के Default Gadgets की लिस्ट दिखाई देगी।
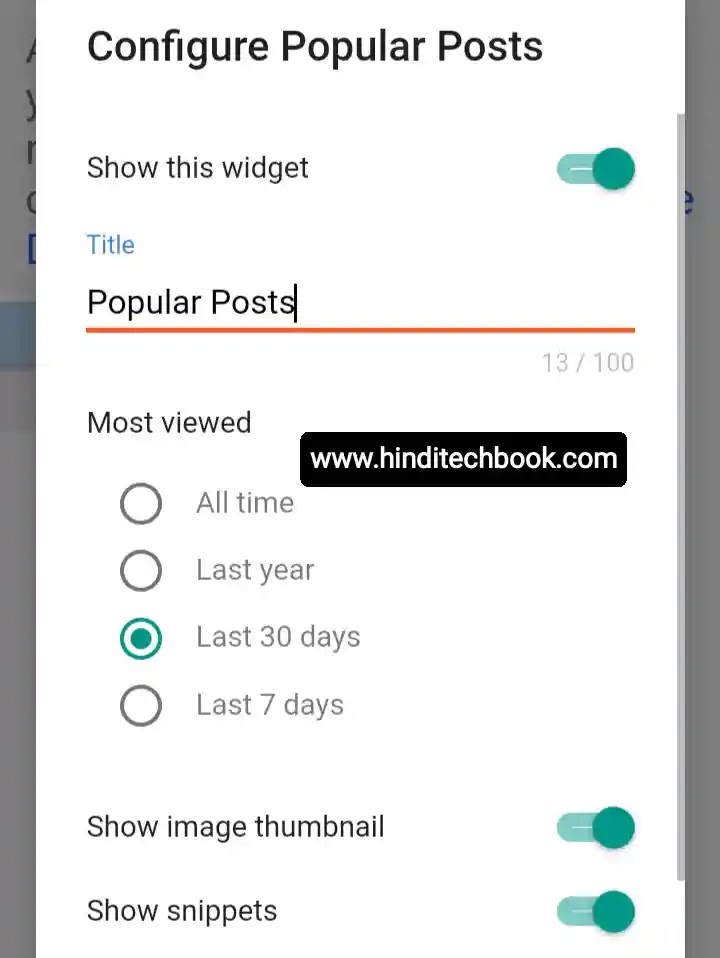
- अब आपके सामने Configure Popular Posts का बॉक्स Open होगा। इसमें Title के Option में Popular Posts लिखें।
- अब Most Viewed को Last 30 Days पर Select करें और Show Image Thumbnail और Show Snippets को On कर दें।

Configure Popular Posts
- अब Maximum Number Of Shown Posts को आप अपने अनुसार 5 या 10 सेलेक्ट कर लें।
- अब Save के बटन पर क्लिक करके Popular Posts Widget को Save कर लें।
अब आपका Popular Posts Widget सफलतापूर्वक Add हो गया है।
Stylish Popular Posts Widget Kaise Add Kare Blogger Mein
ब्लॉगर में Popular Posts Widget लगाने के बाद उनको अच्छे तरीके से Customize करना चाहिए ताकि यूजर्स को देखने में Attractive लगे। इसके लिए हम आपको 5 Different Type Of Stylish Popular Posts Widget दे रहे हैं। जिनको आप कॉपी करके अपने ब्लॉग में लगा सकते हैं।
Popular Posts Widget की जो स्टाइल आपको पसंद आये, सबसे पहले उस Code को कॉपी कर लें।
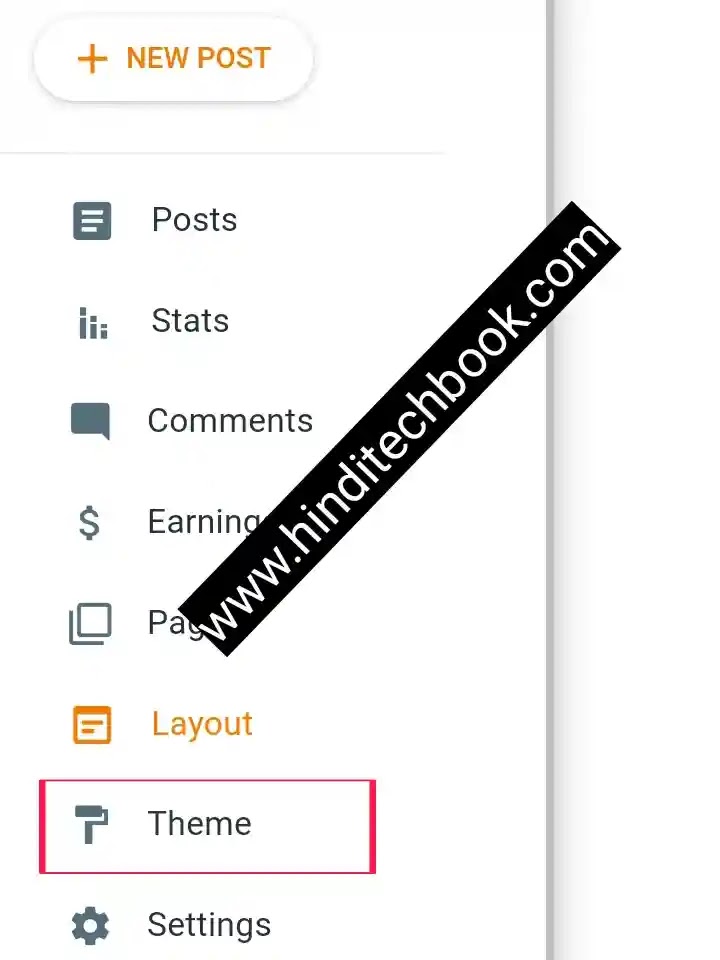
- Theme के Option में Edit HTML पर क्लिक करें। Edit HTML पर क्लिक करने से पहले अपने Blogger Template का Backup जरूर लें।

Click On Edit HTML
- अब कॉपी किए गए को Code को ]]></b:skin> के Just ऊपर पेस्ट करके Template को Save कर लें।
Popular Posts CSS Code For Blogger
.popular-posts{background:#cccccc; margin:4px; margin-top:-4px;}.popular-posts ul{border-radius:6px; box-shadow:0 2px 3px 2px #a6a6a6; font-size:10pt;margin:0 auto;padding:0}.popular-posts ul li{border:1px solid #3b3bbf; background:#cccccc;background:linear-gradient(134deg,#3b3bbf 0,#f4f8ff 20%,#d1edff 84%,#3b3bbf 100%); line-height:2em;list-style-type:none;margin:0;overflow:hidden;padding:10px 20px!important; margin-bottom:1.4px;}.popular-posts ul li:hover{background:#c9d4ea;background:linear-gradient(134deg,#f4f8ff 0,#3b3bbf 40%,#3b3bbf 40%,#f4f8ff 100%);}.popular-posts ul li a{padding:10px 20px;margin:-10px -20px;display:block}.popular-posts a{font-weight:bold; font-style:italic; color:#111; text-decoration:none; font-size:17px;}.popular-posts a:hover{color:8a0000;}#PopularPosts1 h2{display:none;}
#PopularPosts1 ul{width:300px;counter-reset:li;left:-7px;padding:8px 0px 1px;list-style:none;}#PopularPosts1 li .item-title{float:right!important;}#PopularPosts1 li{left:5px;width:95%;position:relative;margin:0 0 10px 0;padding: 3px 2px 0 17px;}#PopularPosts1 ul li{position:relative;display:block;margin: .5em 0;*padding: .2em;background:#ccc;padding: .4em .2em .4em 1em;transition: all 1.3s ease-out;border-radius: .3em;text-decoration: none;}#PopularPosts1 ul li:before{position:absolute;background:#000;color:#fff;content: counter(li);counter-increment: li;margin: -1.3em;left: 0;top: 50%;width: 2em;border: .2em solid #fff;height: 2em;border-radius: 2em;font-weight: bold;font-size: 15px;text-align: center;line-height: 2em;box-shadow: 0 8px 5px -7px #888;-moz-box-shadow: 0 8px 5px -7px #888;-webkit-box-shadow: 0 8px 5px -7px #888;transition: all .3s ease-out;}#PopularPosts1 ul li:hover:before{transform: rotate(360deg);}#PopularPosts1 ul li:hover{background: #eee;}#PopularPosts1 ul li a img{width:25%; float:left; }#PopularPosts1 ul li .item-title {width:68%; float:right; margin-top:-15px; margin-right:15px;}#PopularPosts1 ul li a{min-height:25px;color:#444;display:block;font: 14px Georgia, serif;text-decoration:none;text-transform:uppercase;text-shadow: 0 -1px 2px #fff;}#PopularPosts1 ul li a:hover{color: #444;}
.sidebar .popular-posts ul {padding: 0;margin: 0;counter-reset: popcount;}.sidebar .popular-posts ul li {list-style: none !important;float: left;font-family:’Oswald’,Arial,Tahoma,sans-serif;position: relative;width: 48%;height: 150px;overflow: hidden;margin: 2px;padding: 0 !important;border: 0;}.sidebar .PopularPosts .item-thumbnail {width: 100%;margin: 0;}.sidebar .PopularPosts ul li img {float: left;display: block;height: 150px;width: 100%;padding: 0;-webkit-transition-duration: 1.0s;-moz-transition-duration: 1.0s;-o-transition-duration: 1.0s;transition:1.0s;}.sidebar .PopularPosts ul li img:hover {overflow: hidden;transform:scale(1.06);-webkit-transform:scale(1.06);-moz-transform:scale(1.06);-o-transform:scale(1.06);}.sidebar .PopularPosts .item-title {position: absolute;right: 0;left: 0;bottom:0;padding-bottom: 0;z-index: 999;}.sidebar .PopularPosts .item-title a {display: block;padding: 6px 0px 4px 6px;background: rgba(32, 32, 32, 0.77);text-transform: capitalize;font-size: 14px;color: #fff;line-height: normal;transition: all .3s ease-in-out;}.sidebar .popular-posts ul li:hover .item-title a {background: rgba(231, 76, 60, 0.88);color: rgba(255, 255, 255, 1);text-decoration: none;}.sidebar .popular-posts ul li:before {counter-increment: popcount;float: left;position: absolute;content: counter(popcount, decimal);list-style-type: none;background: #e2e2e2;top: 0;font-size: 15px;color: #000;line-height: 20px;padding: 0px 8px 1px 1px;z-index: 4;border: 1px solid #000;border-radius: 0px 0px 8px 0px;border-width: 0px 2px 2px 0px;}
.sidebar .popular-posts ul {counter-reset: popcount;padding: 0;margin: 0;}.sidebar .popular-posts ul li {float: left;position: relative;overflow: hidden;list-style: none !important;border: 0;height: 130px;width: 100%;font-family: “Oswald”,sans-serif;font-weight: bold;margin: 2px;padding: 0px !important;}.sidebar .PopularPosts .item-thumbnail {width: 100%;margin: 0;}.sidebar .PopularPosts ul li img {display: block;float: left;width: 100%;height: 130px;padding: 0;transition:1.0s;-webkit-transition-duration: 1.0s;-moz-transition-duration: 1.0s;-o-transition-duration: 1.0s;}.sidebar .PopularPosts ul li img:hover {overflow: hidden;transform:scale(1.06);-webkit-transform:scale(1.06);-moz-transform:scale(1.06);-o-transform:scale(1.06);}.sidebar .PopularPosts .item-title {position: absolute;padding-bottom: 0;z-index: 999;right: 0;left: 0;bottom:0;}.sidebar .PopularPosts .item-title a {display: block;background: rgba(32, 32, 32, 0.77);font-family: “Oswald”,sans-serif;font-weight: bold;font-size: 15px;line-height: normal;color: #ffffff;text-transform: capitalize;padding: 10px 0px 5px 10px;transition: all .4s ease-in-out;}.sidebar .popular-posts ul li:hover .item-title a {background: rgba(231, 76, 60, 0.88);color: rgba(255, 255, 255, 1);text-decoration: none;}.sidebar .popular-posts ul li:before {counter-increment: popcount;content: counter(popcount, decimal);position: absolute;list-style-type: none;background: rgba(255, 252, 8, 1);float: left;color: #000;line-height: 20px;font-size: 15px;padding: 0px 8px 1px 1px;border-radius: 0px 0px 8px 0px;border-width: 0px 2px 2px 0px;border: 1px solid #000;top: 0;z-index: 4;}
.popular-posts ul{padding-left:0px;}.popular-posts ul li a{color:#000; text-decoration:none; font-size:15px;}.popular-posts ul li .item-title{float:right; width:70%;}.popular-posts ul li {list-style-type: none;background: #fff url(https://blogger.googleusercontent.com/img/b/R29vZ2xl/AVvXsEivpF9rqm-jd9NzYf-cbOYrlIR8FJgzRfY0SQHTj-qFqIkyj68E49hif47bqEp0tHyzafDvwYXyZKNrezTWcB2p72rG1BYhHW41fM8GcR2ojeE2HopVVMnpfV9YaobMPs5ZytfB0DrwQ9JZkuaw0NWyPsSe2LFTGLjIA5WAQwqgOYa86oVgzs12atuZQg/s12/arrow.gif) no-repeat scroll 5px 10px;border: 1px solid #ddd;padding:5px 5px 5px 20px !important;margin:0 0 5px 0px;border-radius:10px;-moz-border-radius:10px;-webkit-border-radius:10px;}.popular-posts ul li:hover {border:1px solid #6BB5FF;}.popular-posts ul li a:hover {text-decoration:none;}.popular-posts .item-thumbnail img {float:left; width:80px; border-radius: 100px;-moz-border-radius: 100px;webkit-border-radius: 100px;box-shadow: 0 1px 3px rgba(0, 0, 0, .4);-webkit-box-shadow: 0 1px 3px rgba(0, 0, 0, .4);-moz-box-shadow: 0 1px 3px rgba(0, 0, 0, .4);}
अब आपके Popular Posts Widget का Look आपके हिसाब से Customize हो गया है। आप इसी तरह ऊपर दिए गए पांचों स्टाइल में से किसी भी कोड को कॉपी करके अपने Blogger Template में लगा सकते हैं।
और पढ़ें:
Blogger Ke Liye Google Analytics Id Kaise Banaye
Blogger Ke Liye Favicon Kaise Banaye
Blogger Ki Basic Settings Ke Baare Mein Puri Jankari
Blogger Me HTML Sitemap Page Kaise Banaye Step By Step Guide
Conclusion
आज के पोस्ट में हमें 5 Best Stylish Popular Posts Widget For Blogger Blog In 2023 के बारे में विस्तार से जानकारी मिली। हमें आशा है कि आपको यह पोस्ट जरूर पसंद आई होगी। इस पोस्ट के बारे में आप अपने विचार कमेंट में लिख सकते हैं और Social Media पर अपने दोस्तों के साथ Share करना ना भूलें। आप चाहे तो ब्लॉगिंग से Related अन्य सवाल भी कमेंट कर सकते हैं।
धन्यवाद।


